


Up until recently, 2018 seemed to be a bit of a bust when it came to my sewing. For the first five months the only thing I actually managed to sew was my Grevillea Beret, mainly because I was concentrating so much on crocheting. I think the reason I did this was because of the weather. For most of the first half of 2018 it was miserable and grey every single day and all I wanted to do was curl up on the sofa, watch box sets and crochet. It was actually rather relaxing, which was something I needed after how insanely busy my day job has got this year. That in itself, is one of the biggest reasons my blogging, and blog reading, has been rather sporadic this year.
However, my sewing mojo seems to be well and truly back and I’m now ploughing on with all of the plans I talked about in the podcast for my 1930s holiday wardrobe. I’ve already made a gorgeous nautical 1930s top and a very snazzy pair of matching shorts. I made the shorts as a wearable toile for the red ones I have planned and they actually turned out beautifully. I’m really pleased with them and they have been a godsend in the current scorching weather we’re now having.
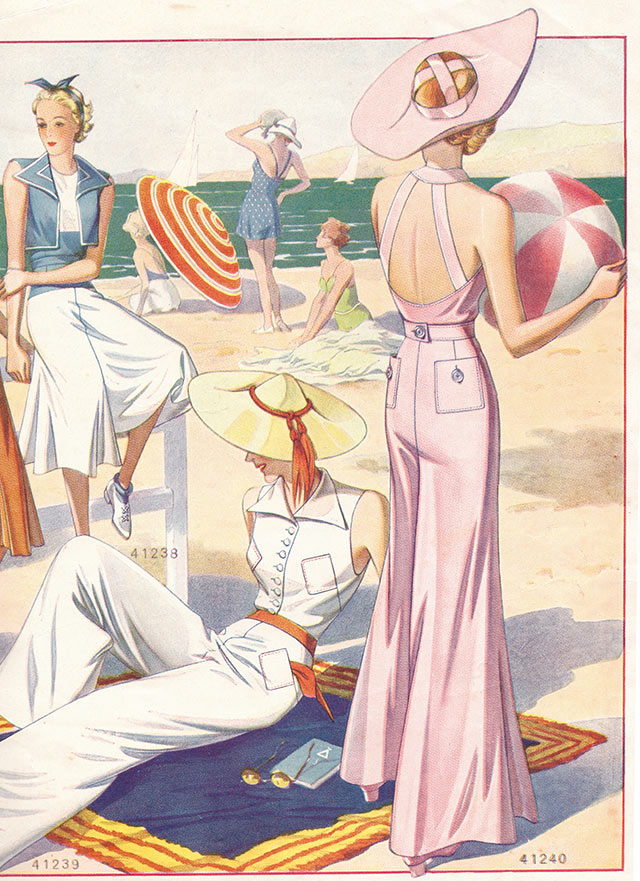
Having completed those two pieces, my mind is now fully focused on the pink 1930s beach pyjamas above. You may remember me mentioning these previously in my sewing and crochet plans, where I showed you the enormous pattern sheet I was tracing the pattern from. (You can also see this crazy pattern sheet in the podcast I’ve linked to above – start watching at about 9.20 minutes in).
There was no way I was going to damage the pattern sheet in any way, so the first job was to get it photocopied. As it’s about the size of an A0 piece of paper, i.e. huge, I had to get this done carefully. Thankfully my mum is the manager of an office stationery shop and had just had a brand new photocopier delivered. However, it couldn’t copy anything bigger than A2, so mum and I spent about an hour painstakingly copying each section on the front and the back, so I had every single pattern piece for every single pattern.
Next it was on to sellotaping these sheets together and, trust me, this was no mean feat. Trying to match up every single overlapping line of the patterns took forever. So far I’ve only done it on the side where the beach pyjama pattern pieces were as I just wanted to get on with the project. Anyway, once it was all stuck together, tracing the pieces of was remarkably easy.
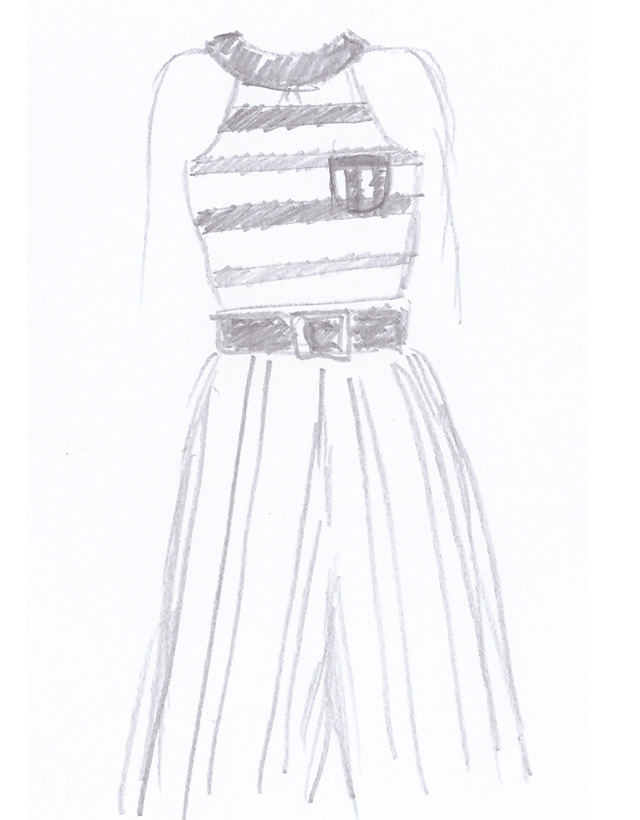
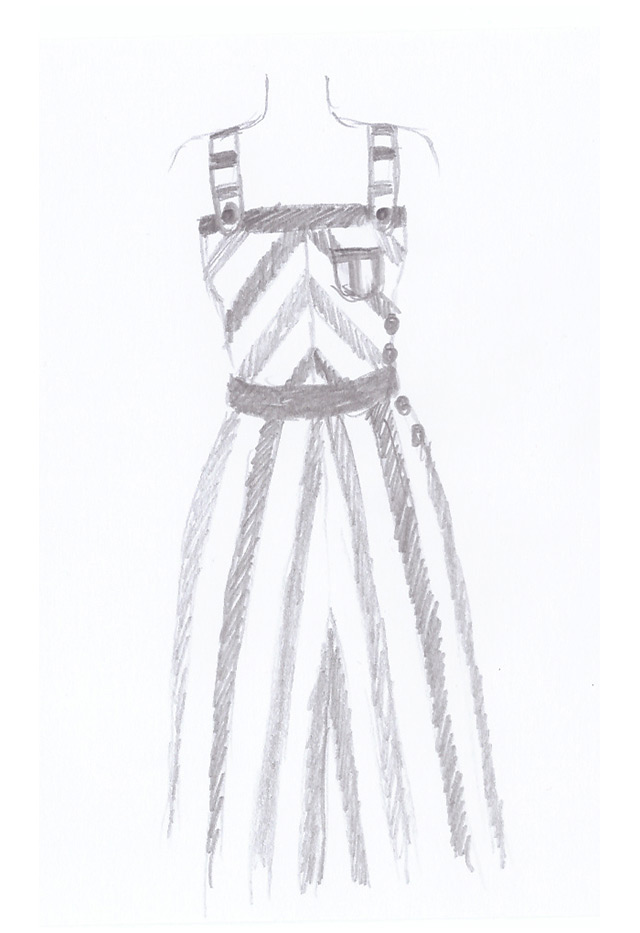
Then it was on to figuring out what adjustments I wanted to make to the top half and how I wanted the fabric to be cut. (Please excuse how roughly drawn these are, I woke up in the middle of the night and had a moment of inspiration. As a result, they were all drawn through blurry eyes!)
The reason I was making adjustments to the top part was because I have to wear a bra and the original design wouldn’t allow for this without being blatantly obvious. The easiest way to change the design was by raising the back part to cover the back strap of the bra. However, my next problem was the front. As it was more of a halter style, as illustrated (badly) above, it would mean a strapless bra and, when you have a DD chest, strapless bras don’t exactly hold you up that well. So, instead of looking forward to spending my time heaving my bra up all day, I decided the front should have a more standard shape and should have straps at the back to cover the bra straps.
Initially, I came up with this idea, with a yoke created in a plain fabric that would go all the way around the top of the front and the back sections. The straps would also be in the plain fabric, with the rest in stripes. I really liked this idea but then I started thinking about the short kimono style jacket I wanted to make to go over it and I was worried that with such a high neck like at the front, that it wouldn’t feel all that summery.
So, then I decided on more of a strap front and had a play about with how they would work. The first one stuck to the same principal of a plain yoke around the top of the front and back and the straps already attached in the same plain fabric. Then I remembered the stunning 1930s beach pyjamas that I first fell in love with, the ones made by Marianne at Fintage.net.
Marianne’s had straps that attached to the top with buttons, both on the front and the back. Yes, this was what I wanted to do. I still continued with the idea of the plain yoke around the top but I still wasn’t quite sure about it. I also played with how the stripes would sit but the idea of matching those stripes down the centre front terrified me!
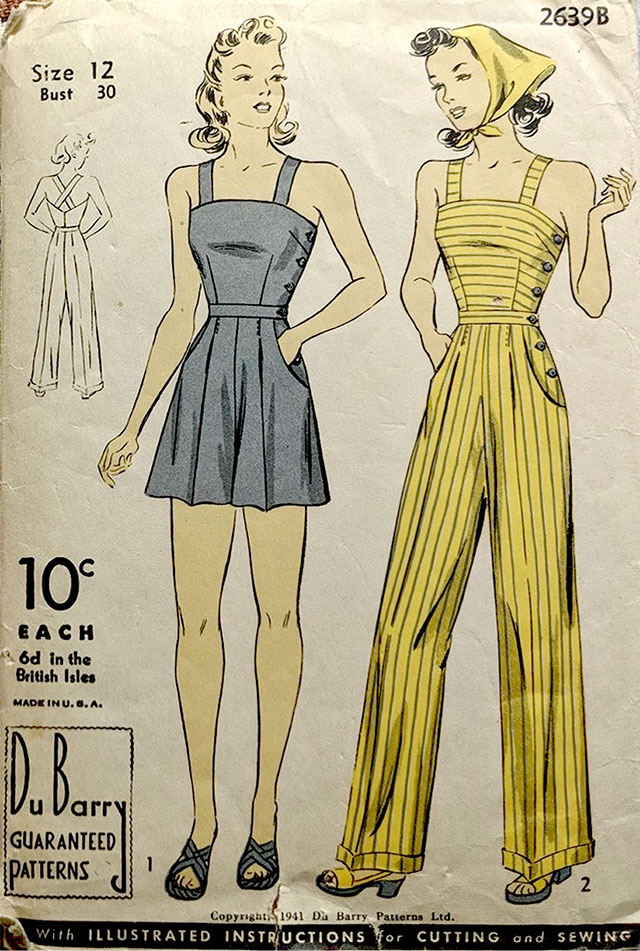
Then I spotted this amazing pattern from 1941 online and in my mind I instantly knew how I wanted mine to look. I would follow exactly the same stripe directions on each piece but have the button on straps like Marianne’s. The trousers would remain the same super wide shape as the original 1930s pattern and not like the more ration-friendly narrow cut with turn-ups of this one. I would also stick to the original pattern’s patch pockets, rather than the side pockets on the 1941, as these are much easier to do and look much more 1930s.

And this is a super rough drawing of what they’ll look like. I may or may not do the belt with a buckle as illustrated, I’ll decide once they’re all done. The original 1930s pattern has a belt that just buttons up at the back, which may work better. I decided to forgo the plain yoke, mainly because I think the fabric (which you’ll see in a minute) speaks for itself and it just wouldn’t add anything extra.
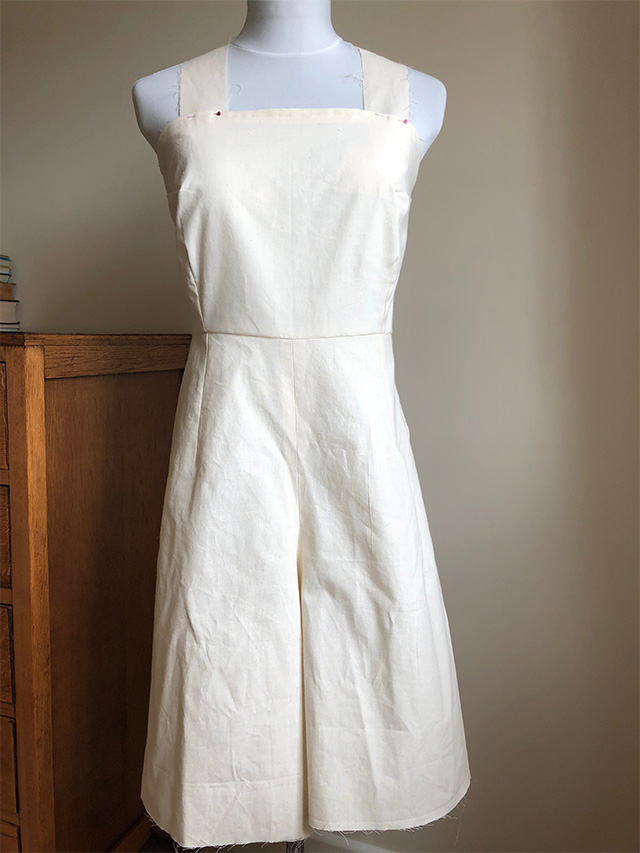
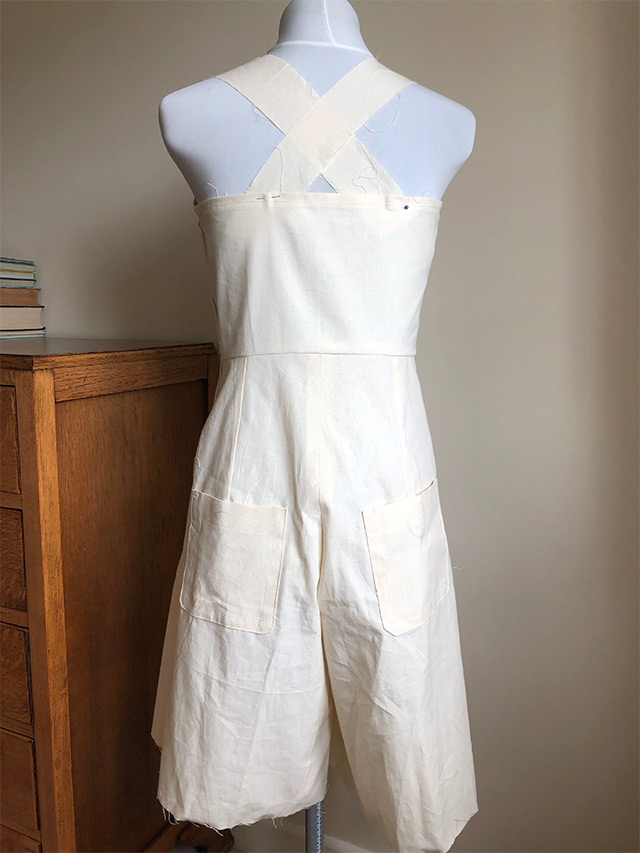
So, after much faffing with the pattern and the dart placement to create the bust shaping, I finally put together a toile that fitted perfectly. The calico I used to make this, my third toile, was very kindly donated to me by William Gee, the fabulous haberdashery shop. If you’ve never heard of them before, they have a brilliant selection of everything you need for your sewing projects. I first discovered them when I was on the hunt for some suitable interlining for my 1930s winter coat and they helpfully answered all my questions about weight and stiffness and advised the best ones to use for my particular project. I was very impressed.
Oh, and just in case you’re wondering if I’d suddenly decided to make these as a playsuit, rather than beach pyjamas, then be assured these will still be full length. I always do short versions of trousers and skirts when mocking up a piece so as not to waste the calico. As long as I can make sure they fit across my hips, bum and thighs, then I’m happy.
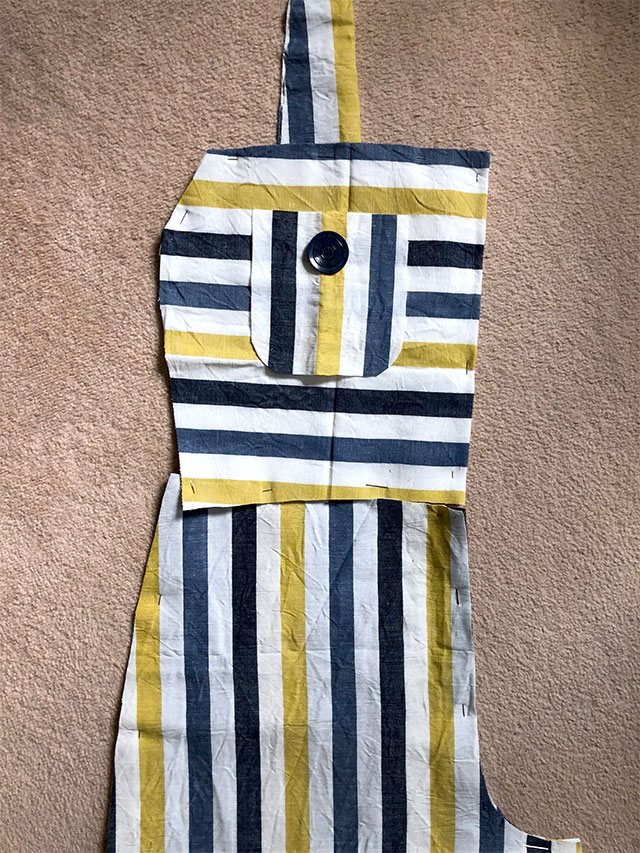
And this is the amazing fabric and how it was cut out. I love all the different directions of the stripes, it’s so 1930s! The fabric itself is from the UK clothing brand Seasalt, who are now offering lengths of the fabric they use in their clothing.
This is a beautiful cotton linen mix and was made ethically in India. Yay for ethical fabric! It hangs beautifully and has a decent enough weave to it that it’s not quite see-through, something I really struggle with. It’s also got a lovely handmade feel too, with the yarn being dyed before it was woven, so the colour stripes have the ivory threads just visible within the weave.
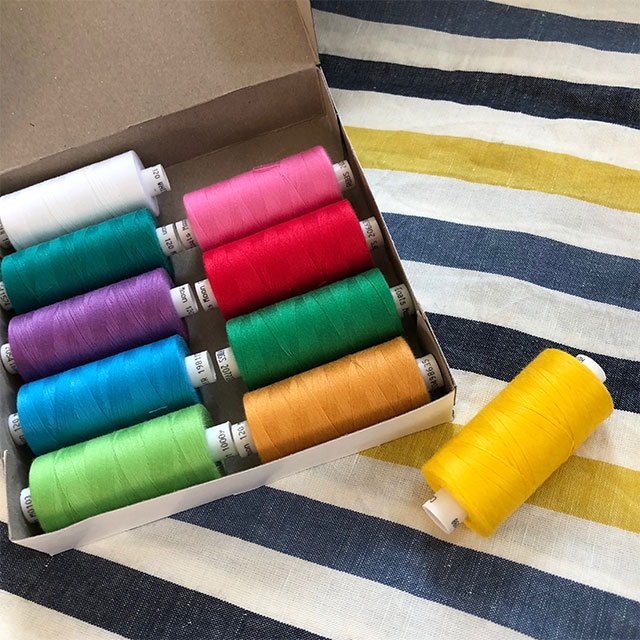
William Gee also kindly sent me this gorgeous box of Coats Moon 120 sewing threads in their Tropical colour range. There’s actually 150 different colours in total to choose from, all available on their website, and they’re great threads. I’ve used them for years and have never had any issues with them. They’re really good value too, just £1 for 1000 yards of thread. At that price they’re great for using on the overlocker when you need to use three or fours threads.
I love how the yellow thread from this box matches the yellow stripe in the fabric and I’m using it for top stitching on my beach pyjamas. It’s not as thick as a proper top stitch thread, but I want it to be a subtle detail, rather than overly showy.

And here they are with the bodice and trousers all sewn together. Aren’t they amazing? The trouser legs are sooooo wide! Here the straps are just off-cuts of fabric I’ve pinned on to show how it will look, but I still have the proper ones to do. I’ve also got to add all of the buttons and buttonholes down the left hand side. The button plackets are all in place ready for them to be done.
Then it’s on to the big patch pockets for the back and hemming the trouser bottoms. Finally I’ll decide on what belt to make and they’ll all be done. I’m hoping to get them finished by the time I go down to Devon in August, but I especially want them for my trip to Spain later on. Now I just need to find a nice multiway bra that I can wear underneath!

I love how you’re taking us through the creative process of designing and ultimately sewing this amazing pair of beach pyjamas. Can’t wait for you posing in them once they’re finished! xxx
Thanks Ann. None of my projects just happen, every single one goes through a long process from concept to finish and I thought it would be good for everyone to see what goes on inside my creative mind! 🙂 xx
Can’t wait to see these finished. I love them but being just over 5 foot I am way to short to wear anything like this LOL
Thanks Vicky! I beg to differ on the height issue. I’m only just 5ft 3 and don’t look at all out of proportion in these. The trick is to make sure the leg parts look long and the natural waist and vertical stripes do that perfectly. And if you’re still not convinced, go have a look at Emileigh’s beach pyjamas on the Flashback Summer blog – http://www.flashbacksummer.com/2015/05/1930s-rain-storm-pajamas.html. If I remember rightly, Emileigh is only just 5ft! xx
I love how you altered these to be wearable with a bra. I often see 1930s clothes (especially cruise wear and sports clothes) that I like but never seriously consider making because it wouldn’t be wearable with a bra. How does the sizing work on the pattern sheet you traced these from? Does it just give one size that you either scale up or down?
Oh, I have to always alter these sorts of patterns to be able to wear a bra, my boobs are too big to go braless! 🙂 Actually the pattern sheet was pretty much spot on! I didn’t have to adjust the trouser part at all, not even on the waist and, apart from the design alterations on the top half, I didn’t really do much at all to it. The only thing that gave me any problem was sorting out the darts. They were very different on the original pattern and would’ve worked for the design, but they just looked wrong once I’d made the design changes. xx
coming along great! I am all heart eyes at that DuBarry pattern ;o)
Thank you Colette! Yes, that DuBarry pattern is stunning, isn’t it? As soon as I spotted it I knew that was what I wanted to do. xx
Wow, those look fantastic! it’s always really interesting seeing the stages you go through to get a design right. And thanks for the link to William Gee; I’d always wondered where people got fabric for fittings from. I’ve been getting by with remnants, but it still works out pricy and I feel guilty for wasting any.
Thanks Mim! William Gee is great place to buy calico. The one I used in this is the medium weight unbleached and it’s usually the cheapest wherever you buy it. If I’m making something much more lightweight then I’ll use a lightweight calico or a cheap unbleached muslin, that way you can judge how the fabric will hang. The great thing about calico is that it can be written on, the seam stitching rips really easily (you can literally hold the pieces of calico and rip the seam open in one go because the calico is hard to tear) and it’s dirt cheap. xx
Gawd I wish I could sew!! These are so divine and I was drooling all over them on Instagram. They are going to look sooooooo good on you! Can’t wait to see them Cate 🙂
Thank you Liz! They’re close to being done now but it hasn’t been an easy ride to get there, trust me. I’ll go into that in more depth in when I get to the outfit post, but trust me it hasn’t been an enjoyable project! xx
I have just found your blog and loving the 1930s styling. I have bought a secondhand sewing machine and I have never sewn before, any advice on where to start? I would love to do a vintage project, but worried it may be far to difficult for a beginner?
I wouldn’t advise using an original vintage pattern just yet as the instructions are always rather limited. Prior to the 60s, most women had a lot of sewing knowledge and so there was no need to go into every detail in the pattern instructions. I think any beginner would really struggle with these. What I would suggest instead is trying a modern reprint of a vintage pattern. Jaycotts very helpfully have a category on their website of all the vintage reprints they do, which you can find here – https://jaycotts.co.uk/collections/patterns_vintage.
I would also suggest starting with something without a zip or button closure. These are tricky for most sewers and we all dread getting to that part of the pattern, so to begin with, I’d try and avoid them until you get a bit more confident. You could start with making a vintage apron like this – https://jaycotts.co.uk/products/s1221 – or a wrap around dress – https://jaycotts.co.uk/products/s1356 or the tie neck version of this top – https://jaycotts.co.uk/products/bd6968.
Anyway, the main thing is to enjoy the process of learning to sew. It’s not something that will be instant and trust me, even advanced sewers like myself have really bad days (I was in tears at the weekend due to these beach pyjamas!). They’re just part and parcel of sewing but, boy, do you feel proud of yourself once you’ve pushed through them and actually made something that you can wear. I wish you all the luck and do let me see whatever you make! xx
Thankyou for your quick response. I shall have a look at the websites.
These are going to be just fantastic! I enjoyed seeing your sketches and reading your thoughts behind your final design choices.
Thanks Kate-Em! They are all finished now, but boy were they a struggle! I will do a blog post eventually, but life just seems to keep getting in the way at the moment. xx